I’m very, very picky about my PC case. I’m not one of those people that covers it in a cacophony of colorful LEDs, but I have a specific set of features I look for in the box that’ll hold all of these expensive components. In my most recent build, and after much internal debate, I ended up heading home with a Cooler Master Stryker.
The first thing I was glad of was the handle on top of the Stryker. The soft rubberized handle allows you to lift this already-heavy case, and it is directly integrated with the top frame of the box. This ensures that you are able to move the box when fully loaded without fear of the case coming apart due to the weight.

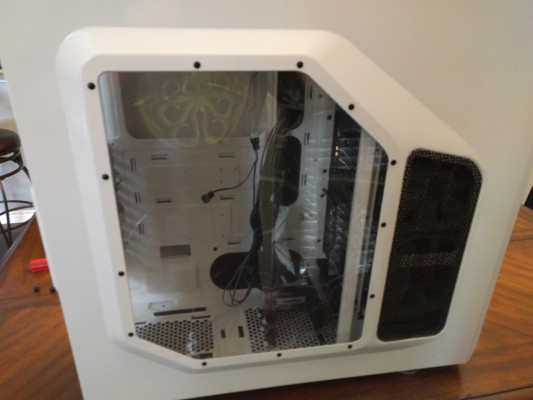
Cthulhu…ever present.
Several aspects of the Stryker appealed to me right out of the gate. The removable filters on top and bottom are a great touch, allowing me to remove dust easily. The 9 expansion slots gave me more options than I could use with my selected ATX board, just in case I suddenly wanted to run in triple-SLI for some reason.
The edges inside the Stryker are all smoothed. I never encountered a rough edge that could potentially cut me or damage a component, and the large cable routing ports would come in handy for my particular build as I knew I’d be starting with a lot of drives and then eventually consolidating down.

So incredibly flimsy.
For my motherboard, I chose the Z170A Gaming M7 from MSI. Using the brass PCB standoffs that came with the board proved to be a challenge. I’m not sure why, but some holes seemed to accept them with ease, and others required a little bit of finesse (read: tiny wrench) to get into place. Perhaps my case had incorrectly drilled holes? Either way, the cavernous space within the case provided plenty of room to mount the board without running my knuckles against the drive cages. You could practically put a couch in here.
The case ships with four fans pre-installed. Two 120mm white LED fans spinning at 1200 RPM provide pass-through cooling for the hard drive enclosure. There are vents on both case sides to provide intake and exhaust opportunities. The rear fan is a black 140mm fan at 1200 RPM, nestled next to the motherboard’s back panel. The top fan is the prime mover here, spinning at 1000 RPM thanks to its 200mm size. These three sets of fans come in at 17 dBA, 19 dBA, and 23 dBA, respectively. For reference, if you aren’t a science dork, a whisper is roughly 20 dBA, and breathing is 10 dBA, so when I say these are “whisper quiet”, it’s technically quieter than that. You can also adjust the speed of the fans on the front of the case, but when they are this quiet (and also controlled via the motherboard), there is really no need to adjust them.

It’s an impressive array of fans. It’s a shame you can’t remove the top one.
It’s not all sunshine and rainbows with the fan situation, however. For my build I had chosen a Corsair H110i closed-loop water cooler for my processor. It wasn’t on the approved list from Cooler Master, but it looked strikingly similar to the two dual-fanned liquid coolers from companies I’d never heard of. I rolled the dice, assuming I would have to take out that 200mm fan. Well, it turns out there is almost no access to do that. The screws are driven in from the top down, leaving no access space to reach them. Sure, I could have drilled them out, but that seemed a little ridiculous for something so simple. I couldn’t find any way to remove the top section (it seems to be pop-riveted in) so there was little I could do. In the end, I sent that cooler back and used the Corsair H60– a single-fanned and single radiator closed-loop cooler. While it wasn’t on the approved list from Cooler Master, it’s held securely by the two screws that aligned once I’d removed the rear 140mm fan. I can’t knock Cooler Master too much for not supporting something they don’t list, but that didn’t lessen the frustration of not being able to remove that top fan if I was so inclined.

Lots of space for cable management.
There was one surprise that I didn’t catch during my case selection process — the tool box. Behind the Cooler Master logo at the bottom of the case is a small black box held in by two screws. Inside is all of the various screws, zip ties, cable adapters, and other miscellaneous items you might need for a standard build. It helps to organize the deluge of screws that come with every board and case into one easily-found spot.

This is a pretty fantastic little toolbox included.
The hard drive cages in the Stryker are solid metal, held in by the ever-present oversized screws that can be turned by hand. Within are the hard drive trays you’ll use for mounting your 5.25” hard drives. You can also mount a 3.5” drive if you use the adapter kits here, obviously. Below them is a dedicated metal box that would allow you to put your SSDs near the bottom of the case, but I’d rather have them behind the pair of fans amidst my mechanical drives, so that simply got removed. Sure, SSDs don’t technically need cooling, but a little airflow never hurt anyone.

Your hard drive cage array
If you are using a board that has USB 3.0 support (and that’s fairly likely if your board is new), you’ll be glad to see that the Stryker has two USB 3.0 ports up front, waiting to be connected to your board. Using the PowerBoost of the MSI board I selected, I was able to utilize the rapid-charge functionality for my Nexus 6p phone. The speed of 3.0 is there, but these little things make a world of difference.

An excellent front panel
The cable management space behind the motherboard was the icing on the cake for the Stryker. Power, leads for the front of the case, hard drive cables, and anything else that might obstruct airflow (or make my case look messy) was able to be routed out the various ports in the board. I’d continue to describe, but I’ll let you see for yourself.

Build complete and clean.
Ron Burke is the Editor in Chief for Gaming Trend. Currently living in Fort Worth, Texas, Ron is an old-school gamer who enjoys CRPGs, action/adventure, platformers, music games, and has recently gotten into tabletop gaming.
Ron is also a fourth degree black belt, with a Master's rank in Matsumura Seito Shōrin-ryū, Moo Duk Kwan Tang Soo Do, Universal Tang Soo Do Alliance, and International Tang Soo Do Federation. He also holds ranks in several other styles in his search to be a well-rounded fighter.
Ron has been married to Gaming Trend Editor, Laura Burke, for 28 years. They have three dogs - Pazuzu (Irish Terrier), Atë, and Calliope (both Australian Kelpie/Pit Bull mixes), and an Axolotl named Dagon!

The Cooler Master Stryker is an excellent full-tower case for nearly any build. While you may be somewhat restricted on a liquid cooling solution, the included cooling is extremely quiet. The case is spacious, able to accommodate the largest of videocards, and the cable management space is equally as roomy. At $165 dollars, it may be a little expensive, but the cumulative quality makes it worth the price.
PROS
- USB 3.0 support in the front
- Fans are beyond quiet
- Excellent cable management
- Handle hardpoint is a great feature
- Fits any size card
CONS
- Non-removable 200mm fan
- Cable trays feel delicate
- Small list of compatible coolers
 Buy Now
 Buy Now
 Buy Now
 Buy Now
 Buy Now
 Buy Now